
這篇文章要筆記一下有關AngularJS中, 表單驗證的用法
主要會參考這篇文章 來做整理
1. 首先, 先寫好一個基本的表單 程式碼如下所示:
<!DOCTYPE html>
<html ng-app="myApp">
  <head>
    <title>Form Demo</title>
    <style>body{font-family:"Arial";background-color:#E2E2DC}</style>
  </head>
  <body ng-controller="AppController as ctrl">

      <form ng-submit="ctrl.submit()">
          <input type="text"  ng-model="ctrl.user.username" placeholder="Enter your name"/><br/><br/>
          <input type="text"  ng-model="ctrl.user.address" placeholder="Enter your Address"/><br/><br/>
          <input type="text"  ng-model="ctrl.user.email" placeholder="Enter your Email"/><br/><br/>

          <input type="submit"    value="Submit">
      </form>

      <script src="https://ajax.googleapis.com/ajax/libs/angularjs/1.4.4/angular.js">
      </script>
      <script>
          angular.module('myApp', [])
          .controller('AppController', [function() {
              var self = this;
              self.submit = function() {
                  console.log('Form is submitted with following user', self.user);
            };
      }]);
  </script>
  </body>
</html>
這邊特別要注意到的地方是 ng-model="ctrl.user.username"
(1) 我們在表單中, 將一些欄位資料指派給了controller中的user物件,
然而在實際的controller宣告中卻沒看到user這個類別的宣告跟定義
因為AngularJS會自動生成這個物件供我們使用
(2) 這邊在form標籤上使用 ng-submit,而非在 submit 按鈕上使用 ng-click
這是因為前者的方式可以允許使用者透過在控制項按下Enter的方式送出表單
後者則僅限於使用者要去點擊Submit按鈕才會觸發送出表單的動作(較不彈性)
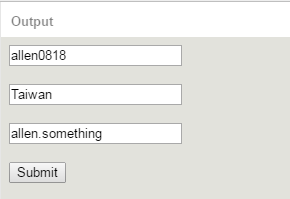
呈現結果如下:
2. 在剛剛建立的表單中加入表單驗證的功能,程式碼如下:
<!DOCTYPE html>
<html ng-app="myApp">
  <head>
    <title>Form Demo</title>
    <style>body{font-family:"Arial";background-color:#E2E2DC}</style>
  </head>
  <body ng-controller="AppController as ctrl">

      <form ng-submit="ctrl.submit()" name="myForm">
          <input type="text" ng-model="ctrl.user.username" name="uname" placeholder="Enter your name" required ng-minlength="3"/>
              <span ng-show="myForm.$dirty && myForm.uname.$error.required">This is a required field</span>
              <span ng-show="myForm.$dirty && myForm.uname.$error.minlength">Minimum length required is 3</span>
              <span ng-show="myForm.$dirty && myForm.uname.$invalid">This field is invalid </span><br/><br/>

          <input type="text" ng-model="ctrl.user.address" placeholder="Enter your Address"/><br/><br/>

          <input type="email" ng-model="ctrl.user.email" name="email" placeholder="Enter your Email" required/>
              <span ng-show="myForm.$dirty && myForm.email.$error.required">This is a required field</span>
              <span ng-show="myForm.$dirty && myForm.email.$invalid">This field is invalid </span><br/><br/>

          <input type="submit" value="Submit" ng-disabled="myForm.$invalid">
      </form>

      <script src="https://ajax.googleapis.com/ajax/libs/angularjs/1.4.4/angular.js">
      </script>
      <script>
          angular.module('myApp', [])
          .controller('AppController', [function() {
              var self = this;
              self.submit = function() {
                  console.log('Form is submitted with following user', self.user);
            };
      }]);
      </script>
  </body>
</html>
(1) 首先, 為了更明確指到目前表單驗證的欄位, 我們在每個需要被驗證的欄位中加上name的屬性
(2) 接著指定欄位的驗證條件,譬如:
<input type="text" ng-model="ctrl.user.username" name="uname" placeholder="Enter your name"
required ng-minlength="3"/>
required ng-minlength="3"/>
這邊指的是這個輸入欄位是必要的(required), 且要求最少不得少於3個字元 (ng-minlength="3")
(3) 若不符合條件, 我們則會在span欄位中show出不符合條件的原因, 如下所示:
<span ng-show="myForm.$dirty && myForm.uname.$error.required">This is a required field</span>
<span ng-show="myForm.$dirty && myForm.uname.$error.minlength">Minimum length required is 3</span>
<span ng-show="myForm.$dirty && myForm.uname.$invalid">This field is invalid </span>
這邊有幾個地方需要特別注意:
# myForm.$dirty
這個值只會在使用者開始對表單做輸入或編輯動作後,才會變成True
# myForm.uname.$error.required
當使用者未輸入必要的欄位時, 這個值會變成True
# myForm.uname.$invalid
當使用者在某個欄位中所設置的Validator其中有一項不符合時, 這個值就會變為True
(4) 若其中有欄位不符合條件, 我們就把Submit的按鈕Disable起來
<input type="submit" value="Submit" ng-disabled="myForm.$invalid">
這邊要特別注意的是 ng-disabled 這個directive的用法
呈現結果如下:
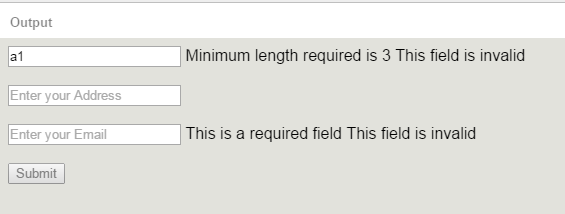
可以看到跟原先的表單比起來, 若使用者未符合該輸入欄位的檢驗條件
螢幕上便會show出未符合條件的原因, 並將Submit按鈕Disable起來
3. 在表單驗證的錯誤訊息部份加上CSS的設定來美化其顯示,
先在表單中加入下面這段CSS後, 並在各個輸入欄位中加上對應的Class名稱:
<style>
      .username.ng-valid {
          background-color: lightgreen;
      }
      .username.ng-dirty.ng-invalid-required {
          background-color: red;
      }
      .username.ng-dirty.ng-invalid-minlength {
          background-color: yellow;
      }

      .email.ng-valid {
          background-color: lightgreen;
      }
      .email.ng-dirty.ng-invalid-required {
          background-color: red;
      }
      .email.ng-dirty.ng-invalid-email {
          background-color: yellow;
      }
</style>
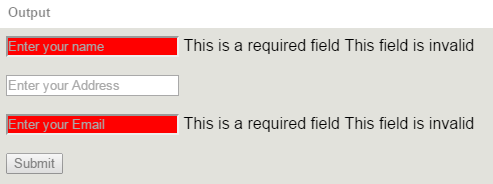
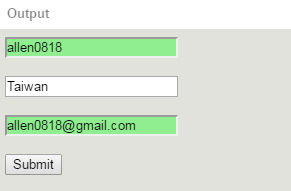
如此一來,最後呈現的結果就會變成這樣囉:
表單欄位未通過驗證
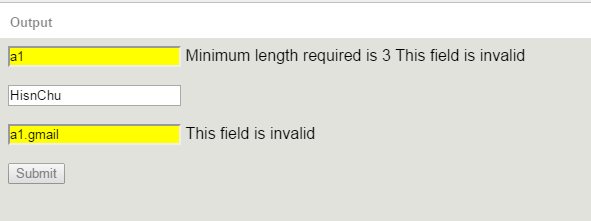
表單各欄位通過驗證後
表單驗證的部份大概是這樣~~ 這篇文章的範例可以點擊這個連結來玩玩看: https://jsbin.com/jijede/edit
另外,我參考的那篇文章中還有介紹到整合BootStrap樣式的範例
另外,我參考的那篇文章中還有介紹到整合BootStrap樣式的範例
只是有點偏離這篇的主題了...有興趣的朋友可以點進去參考看看哦~ : )
References:
文章標籤
全站熱搜


 留言列表
留言列表


